Auto migrations
Continuing from the previous post about database migrations, this post will look at how auto migrations are implemented in Piccolo.
Defining an app
Auto migrations exist in the context of an app. An app is simply a Python package, which contains a Python file at it's root containing an AppConfig instance. This Python file is called piccolo_app.py by convention.
Here's an example of the folder structure, where 'blog' is our app:
piccolo_conf.py
/blog
    __init__.py
    piccolo_app.py
    tables.py
    /piccolo_migrations
You can create new apps very easily using the following command:
piccolo app new my_app_nameThe contents of the piccolo_app.py file looks like this:
# piccolo_app.py
"""
Import all of the Tables subclasses in your app here, and register them with
the APP_CONFIG.
"""
import os

from piccolo.conf.apps import AppConfig
from .tables import (
    Author,
    Post,
    Category,
    CategoryToPost
)


CURRENT_DIRECTORY = os.path.dirname(os.path.abspath(__file__))


APP_CONFIG = AppConfig(
    app_name='blog',
    migrations_folder_path=os.path.join(CURRENT_DIRECTORY, 'piccolo_migrations'),
    table_classes=[Author, Post, Category, CategoryToPost],
    migration_dependencies=[],
    commands=[]
)
The important thing to realise is we explicitly import and register any Table classes which belong to this app.
The reason we do this is:
- To make sure all of the necessary tables have been imported.
- To reduce the amount of metaclass magic we'd otherwise have to do, which makes the system less flexible.
You'll also notice that AppConfig has a migration_dependencies argument. This is a list of import paths for other Piccolo apps whose migrations you need to run before the current app.
['my_other_app.piccolo_app']Registering the app with piccolo_conf
Make sure you register your apps in the piccolo_conf.py AppRegistry.
# piccolo_conf.py
from piccolo.engine.postgres import PostgresEngine
from piccolo.conf.apps import AppRegistry


DB = PostgresEngine(config={
    'database': 'headless_blog_demo'
})


APP_REGISTRY = AppRegistry(apps=['blog.piccolo_app'])
Creating our first migration
Now we have the basic machinery in place, we'll ask Piccolo to create a migration for us.
From the root of our project:
piccolo migrations new blog --autoPiccolo will get all of the Table classes from the app's AppConfig, so it can build a picture of the required schema.
It will then look at the existing migrations for the app so it can build up a snapshot of the existing schema.
Piccolo then compares the current schema as defined in your AppConfig, to the snapshot, and will generate the necessary alter statements.
These alter statements are then written to a new Python file in the piccolo_migrations folder, which is given a timestamp as an identifier.
After you have run this migration, the database schema should now match the desired state.
piccolo migrations forwards blogMigration file contents
In theory, you shouldn't have to worry much about the contents of the migration files. Just create and run them, and Piccolo will do the rest.
However, it's important for understanding how the underlying migration machinery works, so let's take a look at a simple migration file:
from piccolo.migrations.auto import MigrationManager


ID = "2020-03-21T15:05:43"


async def forwards():
    manager = MigrationManager()
    manager.add_table("Author", tablename="author")
    manager.add_column(
        table_class_name="Author",
        column_name="name",
        column_class_name="Varchar",
        params={
            "length": 255,
            "default": "",
            "null": False,
            "primary": False,
            "key": False,
            "unique": False,
            "index": False,
        },
    )

    return manager
It all hinges on a class called MigrationManager. It's how we register any changes we want to make to the schema. Also, note that the forwards function needs to return it.
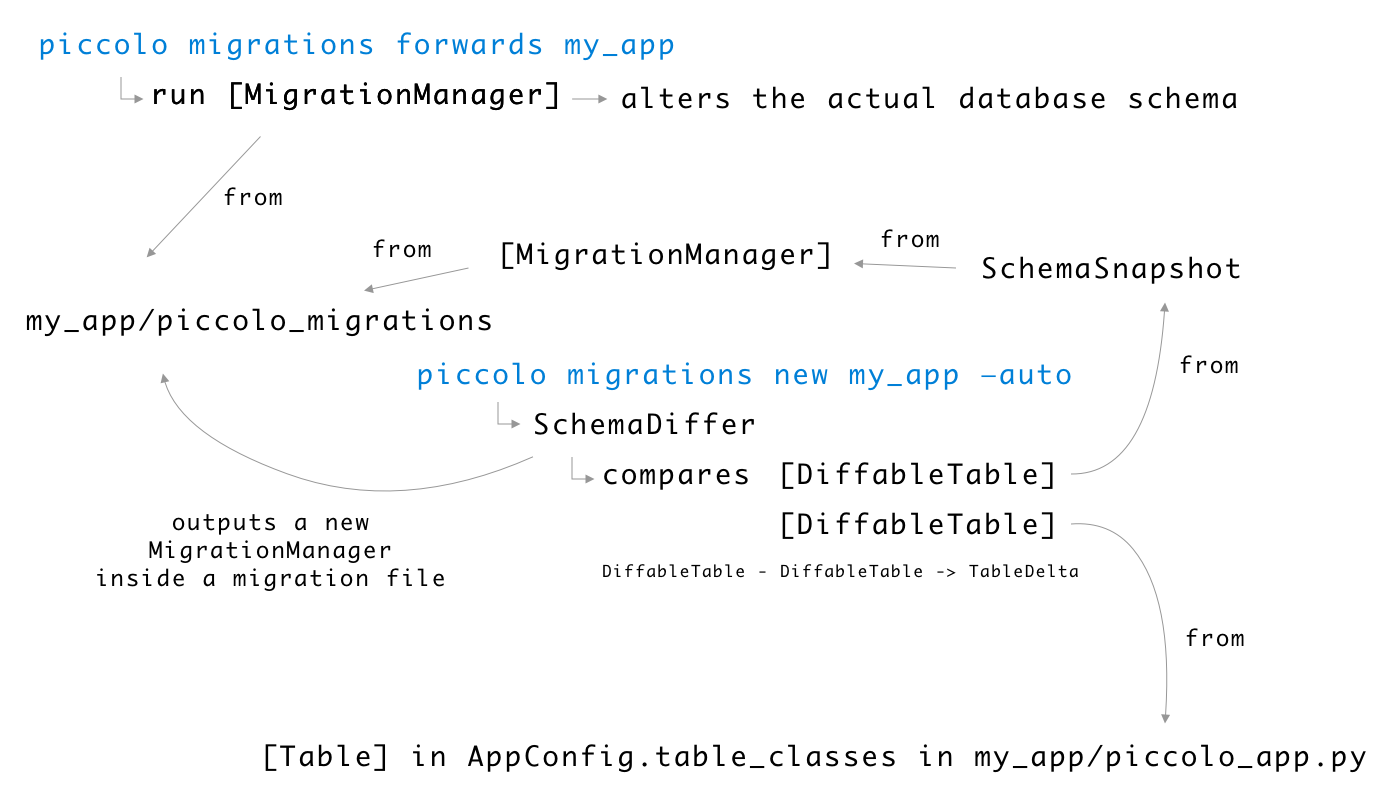
The way that Piccolo applies the required schema changes is to run the returned MigrationManager.
But MigrationManger serves another important purpose - if we give a sequence of MigrationManager instances to a SchemaSnapshot, it can add them up to build a complete picture of the schema.
The next time the user creates a new migration, Piccolo uses a SchemaDiffer to work out the differences between the snapshot, and the current Table classes, and generates a new MigrationManager instance, which it writes to a migration file.
Here's a visualisation of how auto migrations work internally:
Posted on: 15 Mar 2020
Have any comments or feedback on this post? Chat with us on GitHub.